Oh, friend, there’s just something magical about the smell of freshly baked bread, isn’t there? It fills your home with such warmth and comfort, instantly transporting you to cozy memories of grandmother’s kitchen or lazy Sunday mornings. For me, that aroma is pure happiness. But let’s be honest, making artisan bread can sometimes feel a little intimidating, right? All that kneading, proofing, and fussing… well, what if I told you there’s a way to get that incredible, crusty, deeply flavorful artisan loaf with minimal effort? Say hello to this amazing Roasted Garlic Rosemary Artisan Bread recipe! It’s so unbelievably easy, it almost feels like cheating. Seriously, if you can stir, you can make this bread. Get ready to impress yourself and everyone around your table!
Why You’ll Love Roasted Garlic Rosemary Artisan Bread
- Fast (Hands-on Time!): While there are a couple of rise times, the actual hands-on work is incredibly quick, leaving you free to do other things while the magic happens.
- Easy: No kneading required! Just a simple mix, some patience, and you’re good to go.
- Giftable: This loaf makes an absolutely thoughtful and delicious homemade gift for friends, neighbors, or anyone who appreciates good food.
- Crowd-Pleasing: The rich flavor of roasted garlic combined with fragrant rosemary makes this bread an instant hit with everyone, guaranteed!
Ingredients
- 1 whole head garlic: This is the star! Roasting it mellows its flavor and makes it sweet and spreadable.
- 1 tablespoon extra-virgin olive oil (divided): A little for roasting the garlic, a little for the dough to give it that lovely richness.
- Coarse sea salt & freshly ground black pepper: Essential for seasoning the garlic and enhancing its flavor as it roasts.
- 1½ cups water (room temperature, ~70°F / 21°C): The perfect temperature to wake up your yeast and get things bubbling. Not too hot, not too cold!
- 1 teaspoon active dry yeast: Your little magical helpers that make the bread rise. Make sure it’s active!
- 3 cups bread or all-purpose flour (plus more for dusting): Bread flour gives you a chewier, more structured crumb, but all-purpose works beautifully too for a slightly softer loaf.
- ½ teaspoon dried oregano: Adds a lovely, earthy aromatic touch that pairs perfectly with garlic and rosemary.
- 1 teaspoon kosher or fine sea salt: Crucial for flavor! Don’t skimp on this.
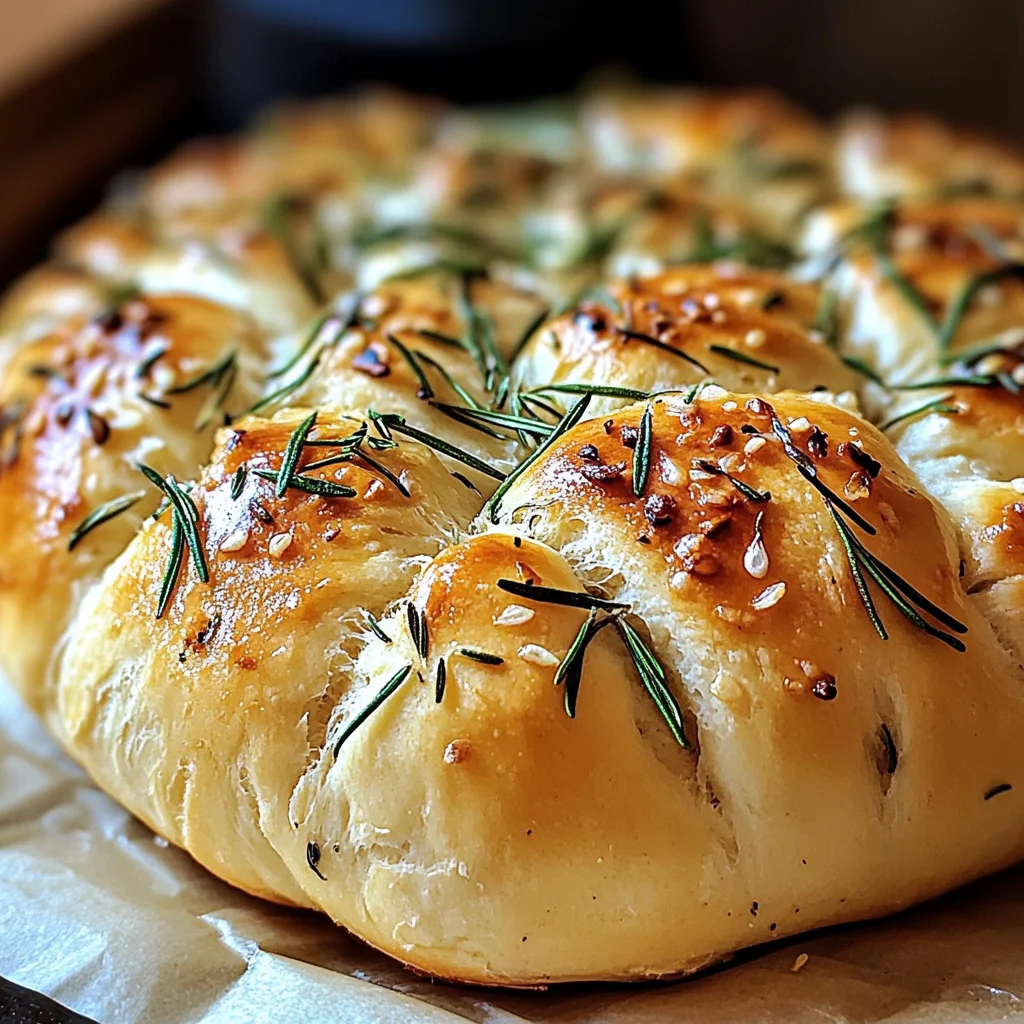
- 2 teaspoons finely chopped fresh rosemary (plus more for topping): Fresh rosemary is key here. Its piney, fragrant notes are simply divine with the roasted garlic.
How to Make Roasted Garlic Rosemary Artisan Bread
Ready to get your hands a little doughy? Don’t worry, it’s the fun kind of doughy!
1. Roast the Garlic
First things first, let’s get that garlic glorious! Preheat your oven to a nice warm 400°F (204°C). Grab that whole head of garlic and carefully cut it in half horizontally, exposing all those lovely cloves. Drizzle the cut sides with a little bit of that extra-virgin olive oil, then sprinkle generously with coarse sea salt and freshly ground black pepper. Now, wrap it up snugly in some foil – like a little garlic present! Pop it into the preheated oven and let it roast for about 40 minutes. You’ll know it’s ready when the cloves are soft and golden brown. Once it’s done, let it cool a bit. When it’s cool enough to handle, simply squeeze or scoop those sweet, mashed roasted cloves right out of their skins. Oh, the smell alone is heavenly!
2. Mix the Dough
Time for the dough! In a small bowl, pour in your room temperature water and sprinkle the active dry yeast over it. Give it a gentle stir and let it sit for about 10-15 minutes. You’re looking for it to get nice and foamy on top – that tells you your yeast is alive and ready to work its magic! While that’s happening, in a large mixing bowl, combine your flour, kosher or fine sea salt, dried oregano, and the finely chopped fresh rosemary. Once your yeast mixture is bubbly, add it to the dry ingredients, along with your mashed roasted garlic and the remaining olive oil. Grab a sturdy spatula and mix everything together until a sticky, shaggy dough forms. Don’t worry about it being perfectly smooth; this is a no-knead wonder!
3. First Rise
Now, for the easiest part: waiting! Cover your bowl with a clean kitchen towel. Find a cozy spot in your kitchen – a warm corner is ideal, but room temperature works just fine. Let the dough rise for a good 8 to 10 hours, or until it has delightfully doubled in size. This long, slow rise is what develops all that amazing flavor and texture without you lifting a finger!
4. Shape and Cold Ferment
When your dough is gloriously puffy, lightly flour a clean work surface. Gently, and I mean gently, turn the dough out onto the floured surface. Resist the urge to knead it! Just gently shape it into a loose ball. Now, carefully transfer your dough, seam-side up, into a floured proofing bowl or a special proofing basket (a regular bowl lined with a floured kitchen towel works great too!). Cover it up and pop it into the refrigerator. This is called cold fermentation, and it’s where the magic really happens for a deeper, more complex flavor. You can let it chill for anywhere from 1 to 24 hours, or even up to 48 hours for an even more profound taste!
5. Preheat Oven & Score
When you’re ready to bake, place your Dutch oven (with its lid!) into your oven and preheat it to a scorching 450°F (232°C). Letting the Dutch oven preheat ensures a super crispy crust. While the oven and pot are getting hot, carefully remove your dough from the refrigerator. Invert the dough onto a piece of parchment paper, making sure the seam-side is now facing down. Using a super sharp blade (like a bread lame or a razor blade), make one deep score or slash across the top surface of the dough. This helps the bread expand beautifully as it bakes.
6. Bake
Now for the grand finale! Carefully, and I mean carefully (that Dutch oven is hot!), transfer the dough along with the parchment paper right into the preheated Dutch oven. Pop the lid on tight and bake for 30 minutes. The lid traps the steam, giving your bread that wonderful, crackly crust. After 30 minutes, remove the lid and continue baking for another 15 to 20 minutes, or until your loaf is a gorgeous golden brown and sounds hollow when you tap its bottom. That’s how you know it’s perfectly done!
7. Cool & Slice
You did it! Carefully remove the bread from the Dutch oven and transfer it to a wire rack. This next step is crucial, I promise: let the bread cool completely for at least 1 hour before you even think about slicing into it. I know, I know, it’s tempting, but this cooling period allows the internal structure to set and prevents a gummy texture. Once it’s cool, slice it up and enjoy the fruits of your labor! This bread is amazing alongside a warm bowl of soup, with a simple salad, or even slathered with a little extra butter. If you’re looking for other comforting, savory dishes that pair wonderfully, you might just love our Savory Garlic Butter Chicken Bites with Lemon Parmesan Spaghetti, or perhaps our famous The Ultimate Classic Carrot Cake if you’re craving something sweet!

Substitutions & Additions
This recipe is super forgiving and open to your creative whims! Here are a few ideas to get you started:
- Herbs: Not a fan of rosemary? No problem! Try fresh thyme, a mix of Italian herbs, or even some finely chopped chives.
- Cheesy Goodness: For an extra layer of flavor, fold in ½ cup of shredded Parmesan, Gruyere, or sharp cheddar cheese during the dough mixing step. The cheese will get wonderfully melty and crusty.
- Olives or Sun-Dried Tomatoes: Add ½ cup of pitted and chopped Kalamata olives or oil-packed, drained, and chopped sun-dried tomatoes to the dough for a Mediterranean twist.
- Whole Wheat Boost: Want a little more fiber? Swap out 1 cup of the all-purpose flour for whole wheat flour. Your bread will be a bit denser but still delicious.
- Spicy Kick: If you like a little heat, add a pinch of red pepper flakes to the dry ingredients.
Tips for Success
- Measure Carefully: Especially the flour! Too much flour can lead to a dry, dense loaf. I always recommend using a kitchen scale for accuracy, but if you’re scooping with a measuring cup, spoon the flour into the cup and then level it off.
- Yeast is Key: Make sure your yeast is fresh and active. If your water and yeast mixture doesn’t get foamy, your yeast might be old, and it’s best to start with a new batch.
- Don’t Rush the Rise: The long rise times are essential for flavor development and texture. Patience truly pays off with this bread!
- Dutch Oven Advantage: A preheated Dutch oven creates the perfect steamy environment for a beautiful crust and tender crumb. If you don’t have one, you can place a pan of hot water on the bottom rack of your oven to create steam, and bake the bread on a baking sheet.
- Cool Completely: As mentioned, resist the urge to slice warm bread! It needs that time to set up internally for the best texture.
- Scoring Smart: The slash on top isn’t just for looks; it helps control where the bread expands, preventing uncontrolled cracks and ensuring a beautiful rise.
How to Store Roasted Garlic Rosemary Artisan Bread
If you have any leftover (which is a big IF, trust me!), storing this delicious bread properly will keep it fresh and tasty.
At room temperature, your artisan bread will stay fresh for about 2-3 days. The key is to keep it in an airtight container or a bread bag to prevent it from drying out. A simple paper bag is great for keeping the crust crisp for the first day, but for longer storage, switch to an airtight option.
For longer storage, this bread freezes wonderfully! Once it’s completely cooled, wrap the entire loaf or individual slices tightly in plastic wrap, then place it in a freezer-safe bag. It will keep well in the freezer for up to 3 months. When you’re ready to enjoy it, simply thaw it at room temperature, and for that “fresh from the oven” feel, you can warm it up in a preheated oven at 350°F (175°C) for about 10-15 minutes.
FAQs
Q: Can I use instant yeast instead of active dry yeast?
A: Yes, you absolutely can! If using instant yeast, you don’t need to dissolve it in water first. Just add it directly to your dry ingredients with the flour, and then proceed with the recipe as normal, adding the water and other wet ingredients. You might find the rise times are a little faster, but follow the visual cues (doubled in size) rather than strict time limits.
Q: Do I really need a Dutch oven to make this bread?
A: While a Dutch oven truly helps create that perfect crust and texture, it’s not strictly necessary. You can still make delicious artisan bread without one. Simply preheat a baking sheet in the oven, and place a shallow pan of hot water on the rack below it to create some steam. Bake the bread directly on the hot baking sheet, following the same temperature and time guidelines.
Q: Can I skip the cold fermentation?
A: You can, but I highly recommend against it if you have the time! The cold fermentation (the time in the fridge) is what develops a much deeper, more complex flavor in your bread. If you’re really in a rush, you can let it rise for an additional 1-2 hours at room temperature for the second rise instead of refrigerating it, but the flavor won’t be as rich.
Q: My dough isn’t rising, what went wrong?
A: The most common culprit is inactive yeast or water that’s too hot or too cold. Ensure your water is around 70°F (21°C) and your yeast is fresh. Also, make sure your kitchen isn’t too cold during the bulk fermentation (first rise).
For more delicious and easy recipes, be sure to check out all our recipes here!
Don’t forget to follow us on Pinterest for more delightful recipes and kitchen inspiration!
Roasted Garlic Rosemary Artisan Bread
Ingredients
Equipment
Method
- Step 1: Roast the Garlic. Preheat your oven to 400°F (204°C). Carefully cut the whole head of garlic in half horizontally, exposing the cloves. Drizzle the cut sides with a little extra-virgin olive oil, then sprinkle generously with coarse sea salt and freshly ground black pepper. Wrap snugly in foil and roast in the preheated oven for about 40 minutes, or until cloves are soft and golden brown. Let cool, then squeeze or scoop the mashed roasted cloves out of their skins.
- Step 2: Mix the Dough. In a small bowl, pour in the room temperature water and sprinkle the active dry yeast over it. Stir gently and let sit for 10-15 minutes until foamy. In a large mixing bowl, combine flour, kosher or fine sea salt, dried oregano, and finely chopped fresh rosemary. Once the yeast mixture is bubbly, add it to the dry ingredients, along with the mashed roasted garlic and the remaining olive oil. Mix with a sturdy spatula until a sticky, shaggy dough forms.
- Step 3: First Rise. Cover the bowl with a clean kitchen towel and let the dough rise in a warm spot at room temperature for 8 to 10 hours, or until it has doubled in size.
- Step 4: Shape and Cold Ferment. Lightly flour a clean work surface. Gently turn the dough out onto the floured surface and gently shape it into a loose ball. Carefully transfer the dough, seam-side up, into a floured proofing bowl or a regular bowl lined with a floured kitchen towel. Cover and place in the refrigerator for 1 to 24 hours (or up to 48 hours for deeper flavor).
- Step 5: Preheat Oven & Score. When ready to bake, place your Dutch oven (with its lid) into your oven and preheat to 450°F (232°C). While heating, remove dough from refrigerator. Invert the dough onto a piece of parchment paper, seam-side down. Using a sharp blade (like a bread lame or razor blade), make one deep score or slash across the top surface of the dough.
- Step 6: Bake. Carefully transfer the dough along with the parchment paper into the preheated Dutch oven. Pop the lid on tight and bake for 30 minutes. After 30 minutes, remove the lid and continue baking for another 15 to 20 minutes, or until the loaf is golden brown and sounds hollow when tapped on the bottom.
- Step 7: Cool & Slice. Carefully remove the bread from the Dutch oven and transfer it to a wire rack. Let the bread cool completely for at least 1 hour before slicing to allow the internal structure to set. Slice and serve immediately.