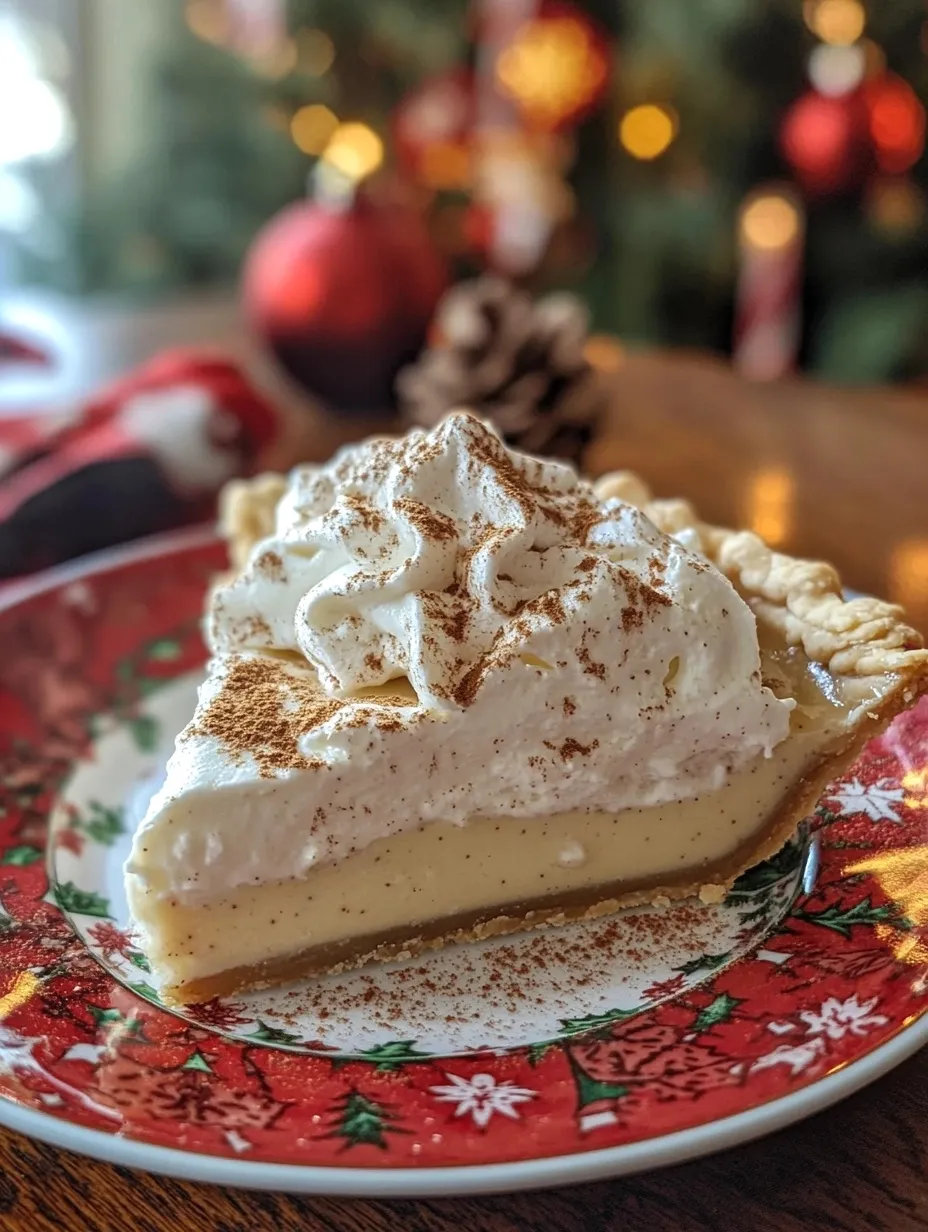
The holidays are a time for family gatherings, festive celebrations, and, of course, indulgent desserts. If you’re looking for the perfect treat to bring to your holiday gathering, look no further than this “Holiday Eggnog Pie.” This dessert is the perfect blend of classic holiday flavors, with a creamy, spiced filling that captures the essence of eggnog, all nestled in a buttery, flaky pie crust.
Whether you’re hosting a festive dinner, attending a holiday potluck, or just craving a seasonal treat, this pie is sure to become a new tradition. It’s rich, velvety, and comforting, and it pairs beautifully with a dollop of whipped cream or a sprinkle of nutmeg. Plus, it’s easy to make, allowing you to focus more on spending time with your loved ones and less on the kitchen.
If you’ve ever wondered what makes eggnog so irresistible, imagine it in pie form—smooth, spiced, and undeniably festive. With the combination of cinnamon, nutmeg, and a touch of rum flavor, this pie will remind you of all the cozy, nostalgic aspects of the holiday season.
What You’ll Need
Before you start whipping up this delicious Holiday Eggnog Pie, make sure you have everything you need. Here’s your shopping list for a perfect pie:
For the Pie Crust:
- 1 ½ cups of all-purpose flour
- ½ teaspoon salt
- 6 tablespoons cold unsalted butter, cubed
- 3 to 4 tablespoons cold water
- 1 tablespoon sugar (optional, for sweetened crust)
For the Eggnog Filling:
- 2 cups eggnog (store-bought or homemade)
- 1 ½ teaspoons ground cinnamon
- ½ teaspoon ground nutmeg
- 1 tablespoon all-purpose flour (for thickening)
- 3 large eggs
- ½ cup granulated sugar
- 1 teaspoon vanilla extract
- ¼ cup dark rum (optional, for added flavor)
- 2 tablespoons unsalted butter (melted)
For the Whipped Topping:
- 1 cup heavy cream
- 2 tablespoons powdered sugar
- ½ teaspoon vanilla extract
- A pinch of ground nutmeg for garnish
Make sure to have these ingredients ready, and you’ll be all set to create this stunning dessert.
")
Step-by-Step Instructions
Creating the Holiday Eggnog Pie is simpler than you might think. Follow these easy-to-follow instructions to make the pie from scratch.
Step 1: Prepare the Pie Crust
- In a large bowl, combine the flour, salt, and sugar (if using).
- Add the cold, cubed butter and mix with a pastry cutter or your fingers until the mixture resembles coarse crumbs.
- Slowly add cold water, 1 tablespoon at a time, and mix until the dough comes together. You may need to add an extra tablespoon if the dough feels too dry.
- Form the dough into a disk, wrap it in plastic wrap, and refrigerate for at least 30 minutes before rolling out.
- After chilling, roll the dough on a lightly floured surface to about 1/8-inch thickness. Carefully fit the dough into a 9-inch pie pan, pressing it into the edges. Trim off excess dough, leaving about ½ inch overhang.
- Use a fork to prick holes all over the bottom of the crust. This will help prevent bubbling during baking.
- Preheat your oven to 375°F (190°C). Line the pie crust with parchment paper and fill with pie weights or dried beans.
- Bake for 15 minutes, then remove the parchment paper and weights. Continue baking for an additional 10-12 minutes until the crust is golden. Remove from the oven and set aside to cool.
Step 2: Make the Eggnog Filling
- In a medium saucepan, whisk together the eggnog, cinnamon, nutmeg, and flour over medium heat. Bring the mixture to a simmer, stirring constantly.
- In a separate bowl, whisk the eggs, sugar, vanilla, and melted butter until smooth.
- Gradually pour a small amount of the hot eggnog mixture into the egg mixture while whisking constantly (this will temper the eggs).
- Slowly pour the egg mixture back into the saucepan with the rest of the eggnog mixture. Stir continuously and cook for 5-7 minutes, until the mixture thickens and coats the back of a spoon.
- If using rum, stir it into the mixture at this stage.
- Remove the saucepan from the heat and let the filling cool for a few minutes.
- Pour the cooled filling into the pre-baked pie crust, smoothing the top with a spatula. Refrigerate the pie for at least 4 hours, or overnight, to allow it to set properly.
Step 3: Whip the Cream Topping
- In a large mixing bowl, whip the heavy cream and powdered sugar together until stiff peaks form.
- Add the vanilla extract and continue whipping until fully incorporated.
- Spoon the whipped cream onto the chilled pie before serving. Garnish with a sprinkle of ground nutmeg for a festive touch.
Step 4: Serve and Enjoy!
Once the pie has set and is topped with whipped cream, it’s ready to be served. Slice and enjoy this perfect holiday dessert with friends and family!
Tips for Success
Making the perfect Holiday Eggnog Pie is easy, but here are some tips to help ensure your dessert turns out perfectly every time:
- Chill the Pie Crust: A chilled pie dough is easier to roll out and prevents shrinking during baking. Make sure to refrigerate the dough for at least 30 minutes before rolling it out.
- Don’t Skip the Pie Weights: Using pie weights or dried beans when blind-baking the crust ensures that the crust holds its shape and doesn’t puff up.
- Properly Temper the Eggs: Gradually incorporating the hot eggnog mixture into the egg mixture prevents the eggs from curdling. Always whisk constantly while pouring the hot mixture to ensure a smooth custard.
- Make the Pie Ahead: This pie needs time to chill and set, so make it a day in advance to save time and ensure the best texture.
- Use Fresh Eggnog: If possible, use fresh eggnog for the most flavorful result. If you can’t find fresh eggnog, store-bought works just fine, too.
Variations to Try
While the classic version of this Holiday Eggnog Pie is delicious, there are plenty of ways to put a twist on the recipe. Here are some variations you can try:
- Eggless Eggnog Pie: For those avoiding eggs, use a custard powder or cornstarch thickener instead of eggs. Look for vegan eggnog to keep the dessert fully plant-based.
- Nutty Crust: Add chopped pecans or walnuts to the pie crust for extra texture and flavor.
- Chocolate Eggnog Pie: Stir in a handful of chopped dark chocolate or cocoa powder into the eggnog filling for a rich, chocolatey twist.
- No-Bake Eggnog Pie: For a simpler version, use a graham cracker crust and a no-bake eggnog filling. Just mix the eggnog filling ingredients and chill until set.
- Spiked Eggnog Pie: If you enjoy the flavor of alcohol in your dessert, add a little bourbon or brandy instead of rum for a different depth of flavor.
Storing and Reheating
If you have any leftovers (though that’s unlikely!), storing this pie is easy:
Storing:
- Cover the pie with plastic wrap or aluminum foil and refrigerate for up to 3 days. The pie will stay fresh and creamy, perfect for snacking or serving at a later date.
- If you need to store the pie for longer than a few days, it’s best to freeze it.
Freezing:
- After the pie has set, wrap it tightly in plastic wrap and then in aluminum foil. Place it in the freezer for up to 1 month.
- To thaw, remove the pie from the freezer and let it sit in the refrigerator for several hours or overnight. Add the whipped cream topping before serving.
Reheating:
Since this pie is served chilled, there’s no need to reheat it. However, if you prefer to serve it warm, you can warm up the filling gently in a saucepan and serve it in a slightly heated crust.
Frequently Asked Questions
Can I make this pie without alcohol?
Yes! The rum in this pie adds a lovely depth of flavor, but it’s completely optional. If you prefer a non-alcoholic version, simply omit the rum, and you’ll still have a delicious pie.
How can I make this pie ahead of time?
This pie actually benefits from being made ahead of time. You can make it the day before serving, allowing it to chill and set overnight in the fridge.
Can I use store-bought pie crust?
Absolutely! If you’re short on time, feel free to use a pre-made pie crust. It will save you some time and effort, while still delivering a great pie.
Can I make this recipe gluten-free?
Yes, you can easily make this pie gluten-free by using a gluten-free pie crust. The filling itself is naturally gluten-free.
Can I use a different spice besides nutmeg or cinnamon?
If you’re looking for a twist, you can experiment with different holiday spices such as allspice, ginger, or cloves. Just make sure to adjust the amounts to your taste.
The Final Word
The “Holiday Eggnog Pie” is the perfect dessert for any holiday celebration. Its creamy, spiced filling, paired with a buttery pie crust and topped with whipped cream, makes it an irresistible treat for guests of all ages. Whether you’re a seasoned baker or a beginner, this pie is simple to make and sure to impress.
With endless variations, this holiday classic can easily be tailored to suit your tastes. And with a little planning, you can make it ahead of time, freeing up your day for more important things—like enjoying time with family and friends.
So this holiday season, bring some cheer to your table with a slice of this festive and delicious pie. You’ll love how it tastes and the joy it brings to your celebration!
Print
Holiday Eggnog Pie
A creamy, spiced eggnog pie that captures the essence of the holiday season. This festive dessert features a velvety eggnog filling, buttery pie crust, and is topped with whipped cream and a sprinkle of nutmeg, making it the perfect addition to any holiday gathering.
- Total Time: 4 hours 35 minutes (or overnight for the best results)
Ingredients
For the Pie Crust:
-
1 ½ cups all-purpose flour
-
½ teaspoon salt
-
6 tablespoons cold unsalted butter, cubed
-
3 to 4 tablespoons cold water
-
1 tablespoon sugar (optional)
For the Eggnog Filling:
-
2 cups eggnog (store-bought or homemade)
-
1 ½ teaspoons ground cinnamon
-
½ teaspoon ground nutmeg
-
1 tablespoon all-purpose flour
-
3 large eggs
-
½ cup granulated sugar
-
1 teaspoon vanilla extract
-
¼ cup dark rum (optional)
-
2 tablespoons unsalted butter (melted)
For the Whipped Topping:
-
1 cup heavy cream
-
2 tablespoons powdered sugar
-
½ teaspoon vanilla extract
-
A pinch of ground nutmeg for garnish
Instructions
-
Prepare the Pie Crust:
-
Combine flour, salt, and optional sugar in a large bowl. Add cold butter and mix until the dough resembles coarse crumbs.
-
Gradually add cold water, mixing until the dough comes together. Chill in the fridge for 30 minutes.
-
Roll out the dough and fit it into a 9-inch pie pan. Prick the bottom with a fork and bake at 375°F (190°C) for 15 minutes with pie weights, then 10-12 minutes until golden. Cool.
-
-
Make the Eggnog Filling:
-
In a saucepan, whisk together eggnog, cinnamon, nutmeg, and flour. Bring to a simmer while stirring constantly.
-
In a bowl, whisk eggs, sugar, vanilla, and melted butter. Slowly pour the hot eggnog mixture into the egg mixture, then return to the saucepan and cook until thickened, about 5-7 minutes. Add rum (optional).
-
Pour into the cooled crust and refrigerate for at least 4 hours or overnight.
-
-
Whip the Topping:
-
Beat heavy cream and powdered sugar until stiff peaks form. Add vanilla and whip until combined.
-
Spread whipped cream over the chilled pie and garnish with nutmeg.
-
-
Serve and Enjoy!
Notes
-
Make ahead: This pie can be made a day in advance, which makes it perfect for holiday gatherings.
-
Optional: For a spicier flavor, feel free to increase the cinnamon or add a dash of allspice or cloves.
- Prep Time: 20 minutes
- Cook Time: 15 minutes (for the crust)
Nutrition
- Calories: 300-350 kcal per slice (depending on size and crust type)
- Sugar: 22g
- Fat: 22g
- Carbohydrates: 30g
- Protein: 4g