Hey there, fellow dessert lover! Do you ever get that craving for something sweet, creamy, and just a little bit special, but maybe you don’t have hours to dedicate to a full-sized cheesecake? Or perhaps you just love adorable, perfectly portioned treats? That’s where these Mini Layered Vanilla Cheesecakes come swooping in! They’re like sunshine in a cupcake liner – easy to make, super cute with their colorful layers, and absolutely delicious. Forget fussy water baths and long bake times; we’re making cheesecake magic happen the simple way!
Why You’ll Love This Recipe
- Fast: No need for hours in the oven or complicated setups. We’re talking quick crusts and a short bake time.
- Easy: If you can mix ingredients and spoon batter, you can make these! Perfect for beginners or busy folks.
- Giftable: Pop these cuties into a nice box, and you’ve got the most thoughtful, delicious homemade gift ever.
- Crowd-pleasing: Who doesn’t love a creamy vanilla cheesecake? Making them mini means everyone gets their own little slice of heaven! Plus, the colorful layers are a fun surprise.
Ingredients
Gather up these simple goodies, and you’ll be well on your way to mini cheesecake bliss:
- Cold heavy whipping cream: This is the base for our dreamy, pipeable topping. Keep it nice and cold!
- Granulated sugar: Sweetens the filling and gives the crust a little extra oomph.
- Vanilla extract: The star flavor! We use it in both the filling and the whipped cream for that classic, comforting taste.
- Melted butter: The glue that holds our cookie crust together.
- Sour cream: Adds tang and moisture to the filling, giving it that signature cheesecake creaminess.
- Vanilla wafer cookie crumbs: The easiest, most perfect base for these mini wonders. Just crush ’em up!
- All-purpose flour: Helps stabilize the cheesecake filling just a touch.
- Cream cheese, room temperature: This is KEY! Make sure your cream cheese is softened so it blends smoothly without lumps.
- Large eggs: Our binders! Room temperature is best here too for smooth mixing.
- Red and Blue gel icing color: This is where the magic happens for those fun layers! Gel colors give you vibrant results without adding too much liquid.
- Powdered sugar: Sweetens the whipped cream and helps make it light and fluffy.
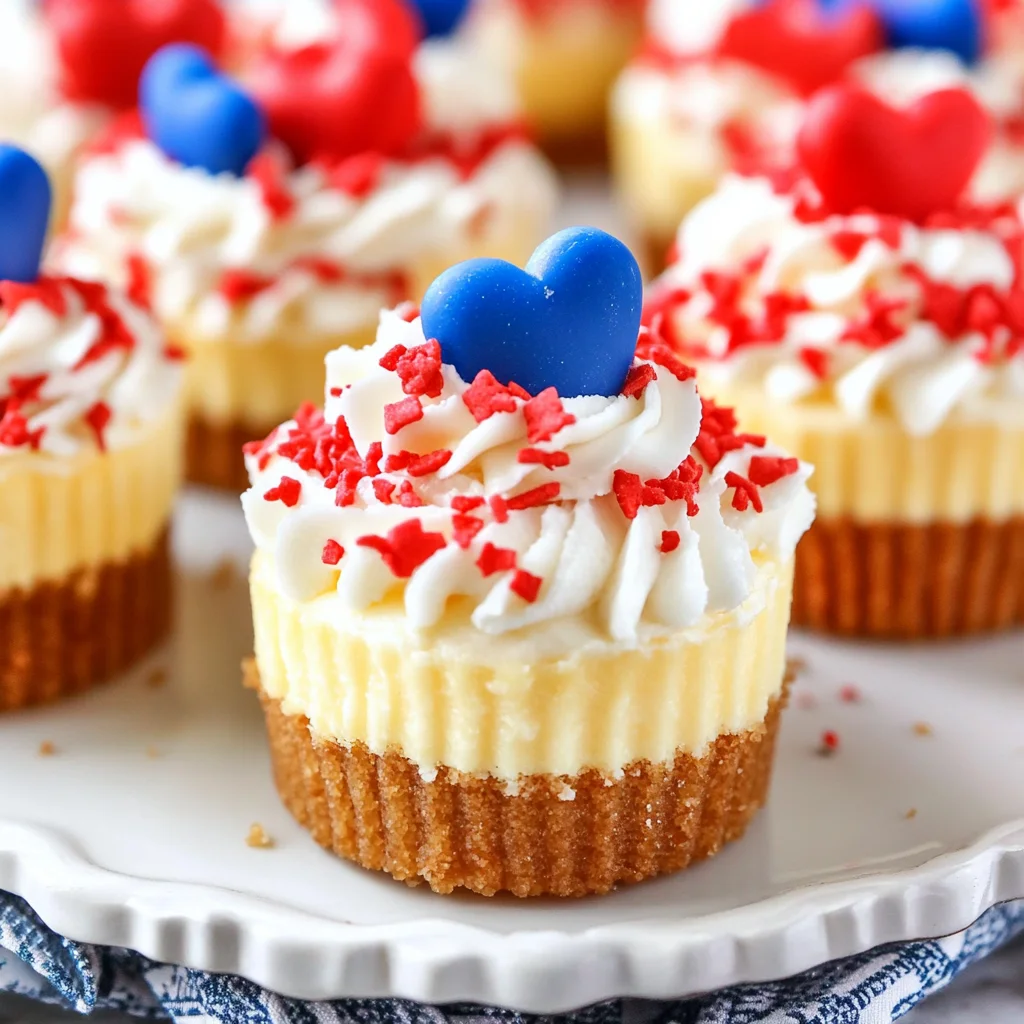
- Sprinkles: Because everything is better with sprinkles!
How to Make It
Alright, let’s get baking! Follow these simple steps, and you’ll have a batch of these adorable cheesecakes ready in no time.
First things first, let’s get the oven ready. Preheat it to 325°F (162°C) and line a standard cupcake pan with cupcake liners. Trust me, the liners make these super easy to handle and serve!
Now, for the crust! In a medium bowl, mix together your vanilla wafer cookie crumbs, 2 tablespoons of granulated sugar, and the melted butter. Give it a good stir until it looks like wet sand and is all combined. Scoop this mixture evenly into the bottom of each prepared cupcake liner. Use a small glass or your fingers to press it down firmly. This creates a nice, sturdy base for our cheesecake.
Pop those crusts into the preheated oven for just 5 minutes. This quick bake helps set the crust so it doesn’t get soggy. While they’re baking, reduce your oven temperature down to 300°F (148°C). Once the crusts are done, take them out and let them cool while you work on the filling.
Moving on to the creamy filling! In a large mixing bowl, beat together the room temperature cream cheese, the remaining 1/2 cup of granulated sugar, and the flour. Beat on low speed until everything is super smooth – no lumps allowed! Make sure to scrape down the sides of the bowl a few times to get everything incorporated. Next, add the sour cream and 1 teaspoon of vanilla extract. Keep beating on low speed until it’s just combined.
Now, gently mix in the eggs, one at a time. Beat slowly after each egg addition, and scrape down the sides of the bowl again. You don’t want to overmix once the eggs are in, or you risk cracks later.
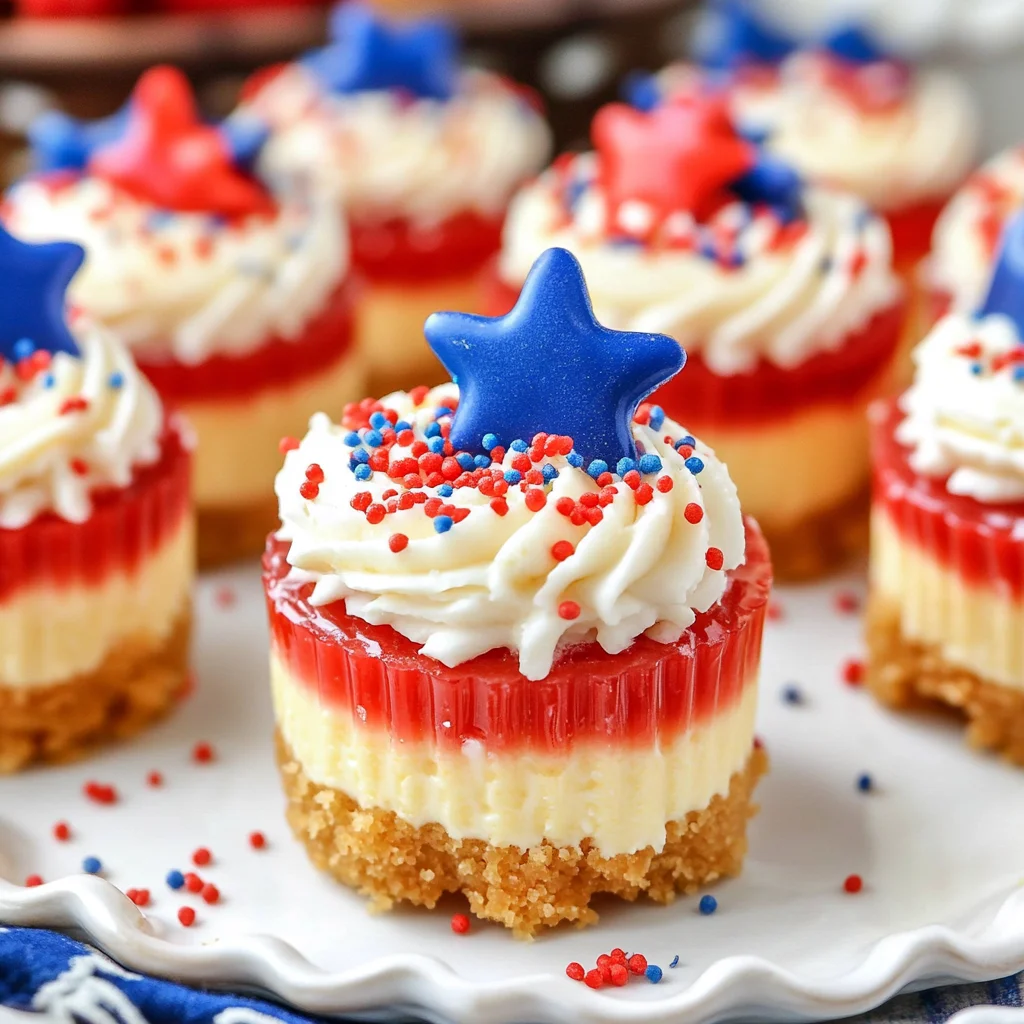
Here’s the fun layering part! Divide your beautiful, smooth batter evenly into three separate bowls. Leave one bowl as is – that’s your white layer. Add a few drops of red gel icing color to the second bowl and mix until you get a lovely red shade. Do the same with the blue gel icing color in the third bowl. You can add more color if you want a more vibrant shade!
Now, spoon the batters into your cooled crusts. I like to start with about a tablespoon of the white batter in each liner, followed by a tablespoon of the red, and then a tablespoon of the blue. Repeat these layers until the liners are almost full. Don’t overfill them! You can lightly swirl the tops with a toothpick if you like the marbled look, or leave the distinct layers – totally up to you!
Bake the cheesecakes for 18-20 minutes. They should look set around the edges but might still be a little jiggly in the center. This is perfect! Turn off the oven, but leave the cheesecakes inside with the door closed for another 10 minutes. This gentle cooling helps prevent cracking.
After 10 minutes, crack the oven door open and let them cool in the oven for another 15-20 minutes. Finally, take them out and let them cool completely on the counter before transferring the whole pan to the refrigerator. They need to chill for several hours, or ideally until they are fully cold and set.
Once they’re perfectly chilled, carefully remove them from the pan.
Time for the finishing touch – the whipped cream topping! In a large mixing bowl, combine the cold heavy whipping cream, powdered sugar, and the remaining 1/2 teaspoon of vanilla extract. Whip on high speed until stiff peaks form. This means when you lift the beater, the peaks stand up straight and don’t flop over.
Pipe or dollop that gorgeous whipped cream onto the tops of your chilled cheesecakes. Finish them off with a sprinkle of your favorite sprinkles for extra cheer!
And there you have it – beautiful, delicious, mini layered cheesecakes ready to be devoured!
Substitutions & Additions
Want to shake things up? Here are a few ideas to get creative with your mini cheesecakes:
- Different Crust: Try graham cracker crumbs, Oreo crumbs (for a chocolate crust), or even crushed shortbread cookies instead of vanilla wafers. Adjust the butter amount if needed until it holds together like wet sand.
- Extracts: Swap out some of the vanilla extract for almond extract, lemon extract, or even a little peppermint extract for a holiday twist.
- Toppings: Instead of just whipped cream and sprinkles, top them with fresh berries, a drizzle of chocolate or caramel sauce, or a dollop of fruit compote.
- No Coloring? No Problem! You can easily leave out the gel colors and make plain vanilla mini cheesecakes. Still delicious!
Tips for Success
Making mini cheesecakes is pretty straightforward, but here are a few things I’ve learned along the way:
- Room Temperature Ingredients: I know I mentioned it already, but seriously, make sure your cream cheese and eggs are at room temperature. This helps prevent lumps and ensures a smooth, creamy filling.
- Don’t Overmix: Especially after adding the eggs. Overmixing can incorporate too much air, which can cause cracks during cooling.
- Gentle Cooling is Key: That trick of leaving them in the cooling oven helps them transition slowly and reduces the chance of those dreaded cracks.
- Fill Evenly: Try to put roughly the same amount of crust and batter in each liner for uniform cheesecakes.
- Prep Ahead: You can make the crusts a day in advance and bake them, or make the entire cheesecake filling base (before coloring) a day ahead and store it in the fridge. Let the filling sit at room temp for 15-20 minutes before layering.
How to Store It
These mini cheesecakes need to stay chilled! Store them in an airtight container in the refrigerator. They are definitely best enjoyed within 2-3 days for optimal freshness and texture.
FAQs
Got questions? I’ve got a few answers!
Why make mini cheesecakes instead of one big one?
They bake faster, cool down quicker, are perfectly portioned, and let’s be honest, they’re just incredibly cute! Plus, no slicing required.
Can I use a different kind of cookie for the crust?
Absolutely! Vanilla wafers are classic and easy, but graham crackers, Oreos, or shortbread work great too. Just make sure they’re finely crushed and mixed with melted butter until they hold together.
My cheesecakes cracked a little! What happened?
Cracking can happen for a few reasons, often related to temperature shock or overmixing. Making sure your ingredients are room temp, not overbeating the batter (especially after adding eggs), and letting them cool gradually in the oven helps a lot. Even with a little crack, they still taste amazing, and the whipped cream topping hides everything!
Easy Mini Layered Vanilla Cheesecakes
Ingredients
Equipment
Method
- Step 1: Preheat oven to 325°F (162°C) and line a standard cupcake pan with liners. In a medium bowl, mix vanilla wafer crumbs, 2 tbsp granulated sugar, and melted butter until like wet sand. Scoop evenly into liners and press down firmly with a small glass or fingers. Bake for 5 minutes.
- Step 2: Reduce oven temperature to 300°F (148°C). Let crusts cool slightly in the pan while you make the filling. In a large mixing bowl, beat cream cheese, remaining granulated sugar (1/2 cup), and flour on low speed until smooth. Add sour cream and 1 tsp vanilla extract; beat until just combined.
- Step 3: Gently mix in eggs one at a time on low speed, scraping down sides. Divide batter evenly into three bowls. Leave one plain. Add red gel color to the second bowl and blue gel color to the third; mix until desired shade is reached.
- Step 4: Spoon batters into cooled crusts, layering white, red, and blue until liners are almost full. Bake for 18-20 minutes, until edges are set but center is slightly jiggly.
- Step 5: Turn off oven, leave cheesecakes inside with door closed for 10 minutes. Crack oven door open and cool for another 15-20 minutes. Remove from oven, cool completely on the counter, then transfer pan to refrigerator and chill for several hours until fully cold and set.
- Step 6: For the topping, combine cold heavy whipping cream, powdered sugar, and remaining 1/2 tsp vanilla extract in a large mixing bowl. Whip on high speed until stiff peaks form. Pipe or dollop whipped cream onto chilled cheesecakes and finish with sprinkles.