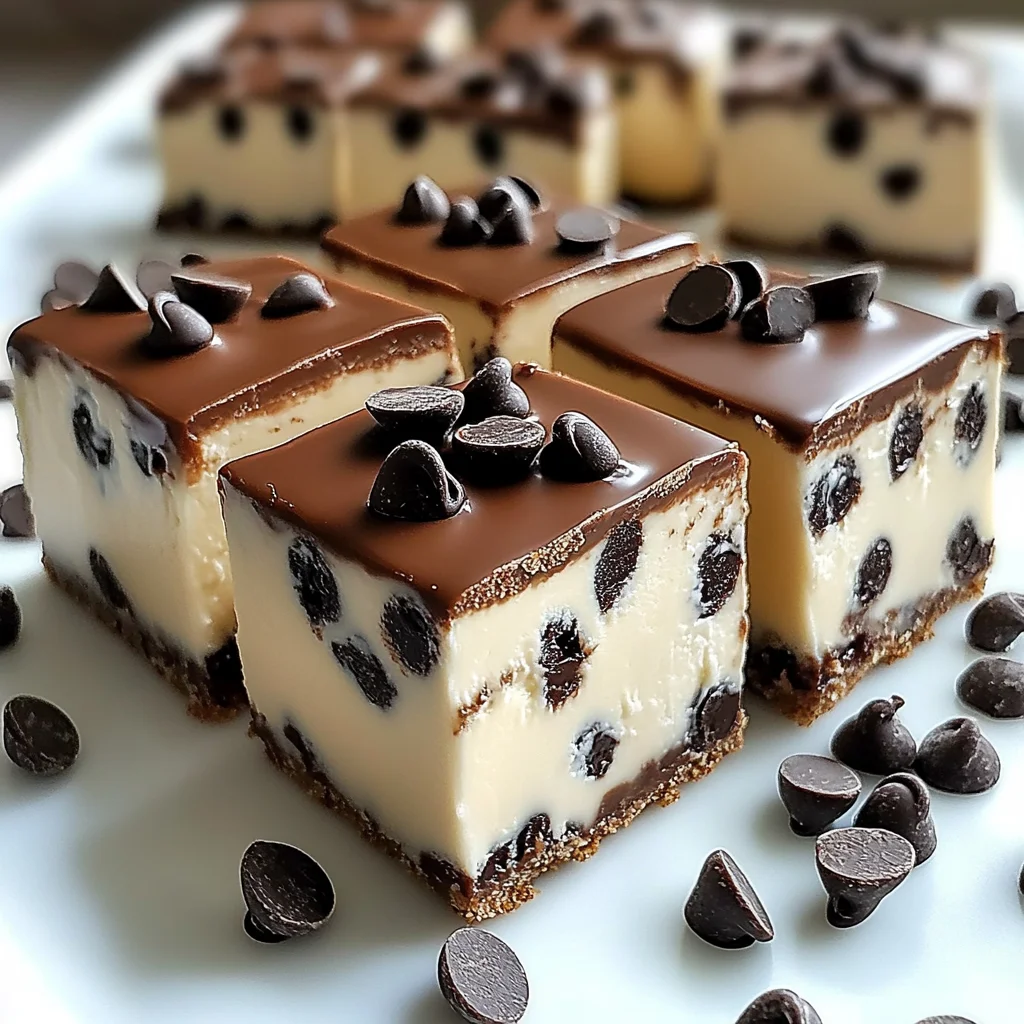
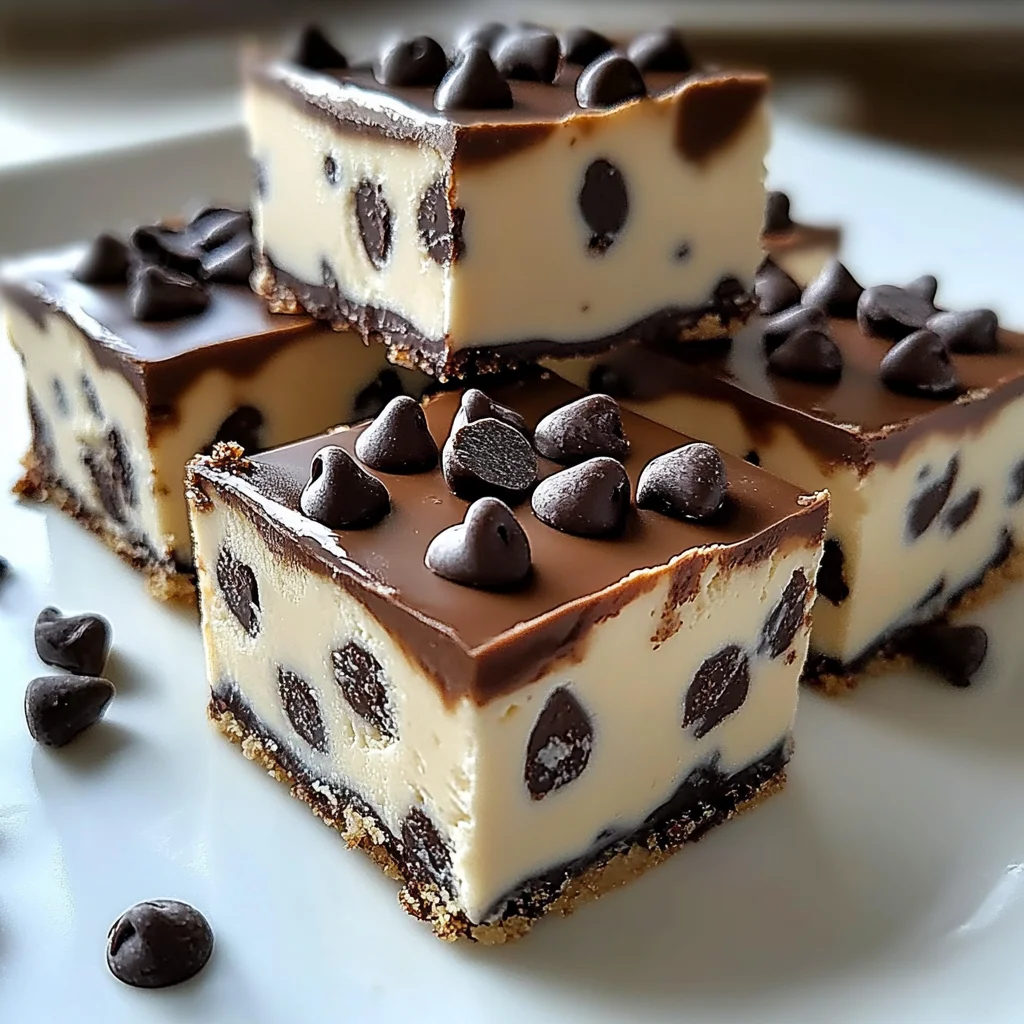
Oh, hello there, friend! Come on in and pull up a chair. You know those moments when you just need a little treat? Something that feels like a warm hug but is also totally decadent and maybe reminds you a little bit of childhood? Well, let’s talk about these Chocolate Chip Cheesecake Bars. They take everything you love about classic chocolate chip cookies and swirl it together with creamy, dreamy cheesecake, all topped with a luscious layer of chocolate ganache. Seriously, what’s not to love?
Growing up, the smell of chocolate chip cookies baking was pure magic. And cheesecake? That felt like a special occasion dessert. Bringing them together in a simple bar form? That’s just genius. This recipe is ridiculously easy to make (no water bath required!) and disappears faster than you can say “more please!” It’s become my go-to for everything from casual get-togethers to just a little Friday night pick-me-up. Ready to make some kitchen magic?
Why You’ll Love This Recipe
These bars aren’t just delicious, they’re wonderfully practical too!
- Fast: Minimal hands-on time means you get to the good part (eating!) sooner.
- Easy: No fancy techniques here, just simple mixing and chilling.
- Giftable: Package these up, and you’ve got the perfect homemade gift for neighbors, teachers, or anyone who needs a smile.
- Crowd-pleasing: Chocolate? Cheesecake? Cookies? It hits all the right notes for everyone!
Ingredients
Gathering your ingredients is the first step to deliciousness! You probably have most of these on hand.
- For the Crust:
- 1 1/2 cups chocolate cookie crumbs: Grab your favorite chocolate cookies (like Oreos, centers and all!) and give them a whirl in a food processor or put them in a bag and crush them with a rolling pin. Easy peasy!
- 1/4 cup melted butter: Just a little butter to bind those crumbs into a perfect base.
- For the Cheesecake Layer:
- 16 oz cream cheese, softened: This is KEY! Make sure it’s properly softened at room temperature, otherwise, you’ll end up with lumps. Patience is a virtue here!
- 1/2 cup sugar: Just enough sweetness to complement the chocolate.
- 1 teaspoon vanilla extract: Pure vanilla adds that essential cozy flavor. Don’t skip it!
- 1 cup mini chocolate chips, divided: Mini chips are great because they distribute nicely and melt slightly without being overwhelming. We’ll use most in the filling and save some for sparkle on top!
- For the Chocolate Ganache Topping:
- 1 cup heavy cream: This is what makes the ganache rich, smooth, and pourable.
- 1 cup semi-sweet chocolate chips: A classic choice for ganache, giving you that perfect balance of sweet and slightly bitter chocolate.
How to Make It
Let’s walk through making these delightful bars. It’s simpler than you think!
First, get your pan ready. Line an 8×8-inch pan with parchment paper, leaving some overhang on the sides. This is your secret weapon for lifting the whole thing out later for clean slicing!
Step 1: Build the Crust. In a bowl, combine your chocolate cookie crumbs and melted butter. Stir it together until it looks like wet sand. Pour this mixture into your prepared pan and press it down firmly and evenly. You can use the bottom of a glass or a flat measuring cup to get it nice and compact. Pop this crust into the refrigerator while you make the filling.
Step 2: Whip up the Cheesecake Filling. In a medium bowl, beat your softened cream cheese, sugar, and vanilla extract with an electric mixer (or by hand if you’re feeling strong!) until it’s completely smooth and there are no lumps. This should only take a minute or two. Once smooth, gently fold in 3/4 cup of those mini chocolate chips. Try not to overmix once the chips are in.
Step 3: Spread the Cheesecake Filling. Carefully spoon and spread the smooth cheesecake filling over the chilled crust in your pan. Get it as even as you can. Now, the hard part (but totally worth it!): back into the refrigerator it goes for at least 3-4 hours. It needs this time to firm up properly so the ganache sits beautifully on top.
Step 4: Make the Glorious Ganache. When your cheesecake layer is almost firm, start on the ganache. Heat the heavy cream in a small saucepan over medium heat until it just begins to simmer around the edges – don’t let it boil rapidly! Remove the pan from the heat immediately, pour the semi-sweet chocolate chips into the hot cream, and let it sit undisturbed for about 5 minutes. This gives the chocolate time to melt. Then, gently whisk or stir until the mixture is completely smooth, glossy, and luscious. It should be pourable.
Step 5: Top it Off! Pour the warm (but not hot!) ganache evenly over the chilled cheesecake layer in the pan. Gently spread it right to the edges with a spatula if needed. While the ganache is still soft, sprinkle the remaining 1/4 cup of mini chocolate chips over the top for extra chocolatey goodness and a pretty finish. Now, back into the refrigerator for another 1-2 hours to let that ganache set up.
Step 6: Slice and Serve. Once everything is beautifully chilled and firm, use the parchment paper overhang to carefully lift the entire cheesecake slab out of the pan and onto a cutting board. For the cleanest slices, use a sharp knife and wipe it clean with a warm, damp cloth between cuts. Slice into bars of your desired size. Serve them chilled and watch them disappear!
Substitutions & Additions
Want to shake things up? Here are a few ideas:
- Crust Swap: No chocolate cookies? You can use graham cracker crumbs or even vanilla wafer crumbs mixed with melted butter for a different flavor profile.
- Extract Adventure: Swap out the vanilla for almond extract or even a little peppermint extract for a holiday twist!
- Chip Change: Use milk chocolate chips, dark chocolate chips, or even peanut butter chips in the filling or ganache for fun variations.
- Swirl it Up: Drizzle some melted caramel, peanut butter, or even a simple berry puree over the cheesecake layer before adding the ganache.
- Fancy Finish: Sprinkle a little flaky sea salt over the top of the ganache for a sweet and salty kick, or add some sprinkles!
Tips for Success
A few little tricks to make sure your bars turn out perfect every time:
- Softened Cream Cheese is Non-Negotiable: Seriously, take it out of the fridge an hour or two beforehand. Cold cream cheese will give you a lumpy filling, no matter how long you beat it!
- Don’t Rush the Chill Time: The chilling steps are crucial for getting firm bars that slice cleanly. Be patient!
- Parchment Paper is Your Friend: Don’t skip lining the pan! It makes removing the bars a breeze.
- Warm Knife for Slicing: Running your knife under hot water and wiping it dry between cuts helps create clean, sharp edges on your bars.
- Ganache Temperature: Let the ganache sit for a few minutes after adding the chocolate chips to the hot cream. You want it smooth and pourable, but not so hot that it melts the cheesecake layer underneath.
How to Store It
Okay, if there are even any leftovers (a big “if” in my house!), here’s how to keep them fresh.
Store Chocolate Chip Cheesecake Bars in an airtight container in the refrigerator. They will keep well for 3-4 days. For longer storage, you can also freeze these bars. Wrap individual bars tightly in plastic wrap, then place them in a freezer-safe container or bag. They should last in the freezer for up to 1-2 months. Thaw them in the refrigerator overnight before serving.
FAQs
Got questions? I’ve got answers!
Q: Can I use regular size chocolate chips instead of mini ones?
A: Yes, absolutely! Mini chips just distribute a bit more evenly in the filling, but regular chips will work fine too. Use whatever you have on hand.
Q: Do I really need to use parchment paper?
A: I highly, highly recommend it! It makes lifting the entire block of bars out of the pan so easy, allowing you to slice them neatly on a cutting board. If you don’t use it, slicing directly in the pan can be messier, and getting the first bar out can be tricky.
Q: My ganache looks lumpy after stirring. What did I do wrong?
A: This usually happens if the cream wasn’t hot enough to fully melt the chocolate, or if you started stirring too soon before the chocolate had time to soften. You can gently heat it again over very low heat, stirring constantly, until it smooths out, or try adding a tiny splash more hot cream.
Q: Can I make these bars ahead of time?
A: Yes! These bars are perfect for making ahead. Since they require significant chill time, you can easily make them the day before you plan to serve them. Just keep them covered in the refrigerator.

Ridiculously Easy Chocolate Chip Cheesecake Bars
Ingredients
Equipment
Method
- First, get your pan ready. Line an 8x8-inch pan with parchment paper, leaving some overhang on the sides.
- Step 1: Build the Crust. In a bowl, combine your chocolate cookie crumbs and melted butter. Stir it together until it looks like wet sand. Pour this mixture into your prepared pan and press it down firmly and evenly. Pop this crust into the refrigerator while you make the filling.
- Step 2: Whip up the Cheesecake Filling. In a medium bowl, beat your softened cream cheese, sugar, and vanilla extract with an electric mixer (or by hand) until it's completely smooth and there are no lumps. Gently fold in 3/4 cup of the mini chocolate chips.
- Step 3: Spread the Cheesecake Filling. Carefully spoon and spread the smooth cheesecake filling over the chilled crust in your pan. Get it as even as you can. Back into the refrigerator it goes for at least 3-4 hours to firm up.
- Step 4: Make the Glorious Ganache. When your cheesecake layer is almost firm, heat the heavy cream in a small saucepan over medium heat until it just begins to simmer around the edges. Remove from heat, pour in the semi-sweet chocolate chips, and let sit for about 5 minutes. Gently whisk or stir until completely smooth, glossy, and pourable.
- Step 5: Top it Off! Pour the warm (but not hot!) ganache evenly over the chilled cheesecake layer in the pan. Gently spread it right to the edges if needed. While the ganache is still soft, sprinkle the remaining 1/4 cup of mini chocolate chips over the top. Now, back into the refrigerator for another 1-2 hours to let that ganache set up.
- Step 6: Slice and Serve. Use the parchment paper overhang to carefully lift the entire cheesecake slab out of the pan and onto a cutting board. For the cleanest slices, use a sharp knife and wipe it clean with a warm, damp cloth between cuts. Slice into bars of your desired size. Serve them chilled.