Remember those rainy days stuck inside? Sometimes they felt a little dreary, but there was also a quiet magic to watching the drops fall, wasn’t there? What if I told you you could capture a little bit of that magic right in your own kitchen, any day you like? This isn’t exactly a recipe you eat, but it’s a recipe for wonder!
Get ready to whip up your very own Rain Cloud in a Jar. It’s seriously one of the easiest, quickest, and most mesmerizing little science experiments/crafts you can do, perfect for a cozy afternoon, a fun activity with the kiddos, or just a moment of quiet observation. It uses simple things you probably already have around the house, and the “results” are just beautiful to watch.
Why You’ll Love This Recipe
- Fast
- Easy
- Giftable
- Crowd-pleasing
Ingredients
You only need a handful of super common things to make your mini rain shower happen. Here’s what to grab:
- 1 large clear jar or glass: The bigger and clearer, the better the show! A Mason jar, an old spaghetti sauce jar you’ve cleaned out, or even a tall drinking glass works great. Make sure it’s nice and clean so you can see the rain clearly.
- Shaving cream (white, foam type): This is your fluffy cloud! Make sure it’s the classic foam kind, not the gel. The cheaper, generic stuff often works best for this!
- Water: Just plain old tap water is perfect. Nothing fancy needed here.
- Food coloring (blue, or a mix of blue and purple): The “rain”! Blue is the classic rain color, but I love mixing a little purple in for a nice stormy look. You can use any color you like, though!
- Small cup or dropper: For mixing your colored water and adding it carefully. A spoon works too, but a dropper gives you more control (and tends to be less messy!).
How to Make It
Alright, let’s make some magic! This is so simple, you barely need instructions, but here they are just in case:
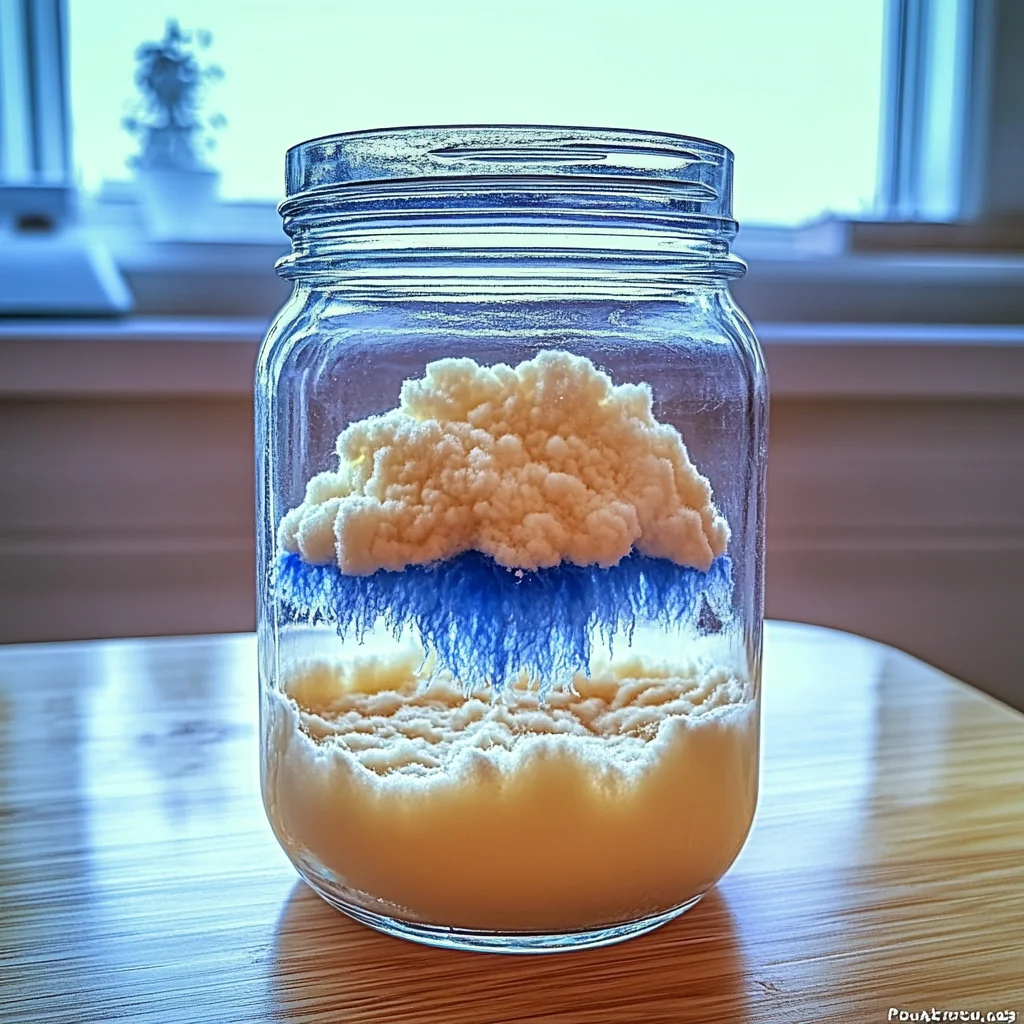
1. Fill the Jar: Grab your big, clear jar and fill it about ¾ full with water. Think of this water as the atmosphere below your cloud, getting ready for the rain. Leave enough space at the top for your fluffy cloud layer.
2. Add the Cloud: Now for the fun part! Generously spray a layer of white foam shaving cream right on top of the water. You want a nice fluffy layer, maybe about 1 to 2 inches thick. Try to get it fairly even across the surface – this is your gorgeous, puffy cloud! Make sure the shaving cream touches the sides of the jar all the way around to create a good barrier.
3. Mix Your “Rain”: In that small cup, put just a little bit of water – maybe a tablespoon or two. Add a few drops of your blue (or blue and purple!) food coloring. Five to ten drops is usually enough to make a nice vibrant color. Give it a gentle swirl with your dropper or a small spoon to mix it evenly. This is your colorful “rainwater” waiting to fall.
4. Let it Rain! Here’s where the magic happens. Carefully use your dropper or spoon to add small drops of the colored water onto the top of the shaving cream cloud. Try not to poke or mix the shaving cream too much. Just let the drops sit gently on top. It’s fascinating to see them pool there before they start to sink.
5. Watch the Show: Now, just wait and watch! As the colored water gets heavy enough, it will start to soak through the shaving cream (your cloud) and drip down into the clear water below, looking just like rain streaks! It might take a minute or two to start, so be patient and enjoy the process. You can add more colored drops to keep the rain going.
Substitutions & Additions
Want to change things up or add a little extra sparkle? Here are some ideas:
- Try different colors: What happens if you use red or green food coloring? Or mix a rainbow of colors on top of the cloud? Each color will create its own cool effect.
- Make it stormy: Add a tiny drop of black food coloring to your blue mix for a moody, storm cloud look. You could even try swirling colors together on the cloud surface before they drip.
- Use a different container: A wide, shallow dish could also work for a different kind of cloud formation, though the rain effect is best observed in a taller jar where you can see the drips clearly.
- Add glitter: A tiny pinch of fine glitter (like craft glitter) in your colored water can make for shimmering rain! (Just be mindful of cleanup when you’re done).
- Educational spin: Talk about density! Explain how the colored water is denser (heavier) than the airy shaving cream cloud, causing it to sink through and fall like rain when the cloud can’t hold it anymore.
Tips for Success
This is pretty foolproof, but here are a couple of pointers to make sure your rain cloud is a showstopper:
- Use FOAM shaving cream: I really can’t stress this enough! Gel type won’t work the same way – it doesn’t have the right airy structure to act like a cloud.
- Don’t add too much colored water at once: Start with a few drops and wait. If you add too much too fast, it just makes a big colored blob on top of the shaving cream instead of dripping through like rain. Patience is key!
- Let it settle: Give the shaving cream a minute or two to settle on the water surface before you start adding the colored drops. This helps create a more stable “cloud.”
- Supervise kids: While it’s a simple activity, food coloring can stain clothes and surfaces! Keep an eye on little hands. Also, remind them it’s for watching, not for eating or drinking!
- Prep ahead? You can fill the jar with water ahead of time, but it’s best to add the shaving cream and colored water fresh right before you want to do the experiment for the best, fluffiest cloud and clearest rain effect.
How to Store It
Honestly? This isn’t really designed for long-term storage. The shaving cream will eventually dissipate into the water, and the beautiful layers will fade. It’s meant to be enjoyed in the moment, watching the magic happen!
You can keep the jar out for a day or two to continue observing it, but after that, the defined cloud will start to disappear. It’s best to just enjoy the show, and then easily dump the contents down the drain (the ingredients are water-soluble) when you’re done. Rinse out the jar, and you’re ready to make another rain cloud whenever the mood strikes!
FAQs
Can I use gel shaving cream?
A: No, definitely stick to the classic white foam type. Gel doesn’t have the right airy structure to hold the colored water and create the “rain” effect properly. It won’t behave like a fluffy cloud!
Why isn’t my rain dripping?
A: Be patient! It can take a few minutes for the colored water to soak through the shaving cream cloud and get heavy enough to drip down. Make sure you’re adding enough food coloring to your water to give it some density, and try adding just a few drops at a time to the cloud’s surface instead of a big pour.
Is this safe for kids?
A: Yes, the ingredients are generally safe (water, shaving cream, food coloring), but adult supervision is highly recommended. Food coloring can stain, and you’ll want to ensure kids don’t try to eat or drink the mixture. It’s an excellent supervised science activity!
Can I reuse the water?
A: Not really for a new experiment. Once the colored water has rained down and mixed into the water in the jar, the water is no longer clear. For the best visual effect of the “rain” dripping down, you’ll want to start with fresh, clear water each time you make a new rain cloud.

Make Your Own Magical Rain Cloud in a Jar!
Ingredients
Equipment
Method
- Step 1: Fill the Jar: Grab your big, clear jar and fill it about ¾ full with water. Leave enough space at the top for your fluffy cloud layer.
- Step 2: Add the Cloud: Generously spray a layer of white foam shaving cream right on top of the water. You want a nice fluffy layer, maybe about 1 to 2 inches thick. Try to get it fairly even across the surface and make sure it touches the sides of the jar all the way around.
- Step 3: Mix Your "Rain": In that small cup, put a little bit of water (maybe a tablespoon or two). Add a few drops (Five to ten drops is usually enough) of your blue (or blue and purple!) food coloring. Give it a gentle swirl to mix it evenly.
- Step 4: Let it Rain! Carefully use your dropper or spoon to add small drops of the colored water onto the top of the shaving cream cloud. Try not to poke or mix the shaving cream too much. Just let the drops sit gently on top.
- Step 5: Watch the Show: Wait and watch! As the colored water gets heavy enough, it will soak through the shaving cream and drip down into the clear water below, looking just like rain streaks! It might take a minute or two to start. You can add more colored drops to keep the rain going.